
This course is truly fantastic. The greens have tremendous movement internally and substantial contouring and run-off areas in the surrounds. Every club in the bag will undoubtedly be tested throughout the day as will the player's ability to move the ball in both directions. And this club also allows the golfer on some holes to play shots low and run them onto the green from a long distance out, a feature sadly lacking in most southern courses as well as much of Mr. Jones's later work. This course is very close to being as good as it gets.
Ranking
Variety of Design: Outstanding. The par 5's all give the player the chance to take an aggressive play and attempt to reach the green in two. The 16th hole is unreachable for all but the longest players and will cause them to put great thought into all 3 shots. Par 4's have solid variety overall, but slightly lack in the very long category and the sub-400 yard category; there is no par 4 that is even close to driveable. The par 3's are also solid in the middle of the scale, but lack in short and very long. Directional variety is fair, but not great, having 6 holes going right, 3 going left, and 9 straight. 8 1/2
Flow of the Course: Very good. The course starts off on a high note, eases off for a couple of holes, gives a reachable par 5, followed by a difficult par 3, the closes out the front nine with 3 solid, but not overly difficult holes. The back nine starts with a solid par 5, goes to a difficult par 3 followed by a difficult par 4, then starts into a very solid closing stretch where the player is given 3 holes closing the round where birdie is a distinct possibility. 8 1/4
Course Conditioning: Outstanding. This may be the best maintained course in the South, with only Eagle Point in North Carolina coming close from what this writer has seen. Fairways, greens, tees, everything maintained exceptionally. 9 1/4
Ease of Walking: The green to tee transitions are very good, with only one exception. The hilly nature of the site does it no favors, but overall, this would not be an impossible course to walk. 8 1/4
Atmosphere: Exceptional. From tournament history to rankings to the club in general, this club is great. When you arrive, you will know you are at an exceptional place. 7
Total: 84 out of 100
Each hole will feature two yardages, one from the Championship tees, one from the Medal tees. Images will be from the Medal tees.
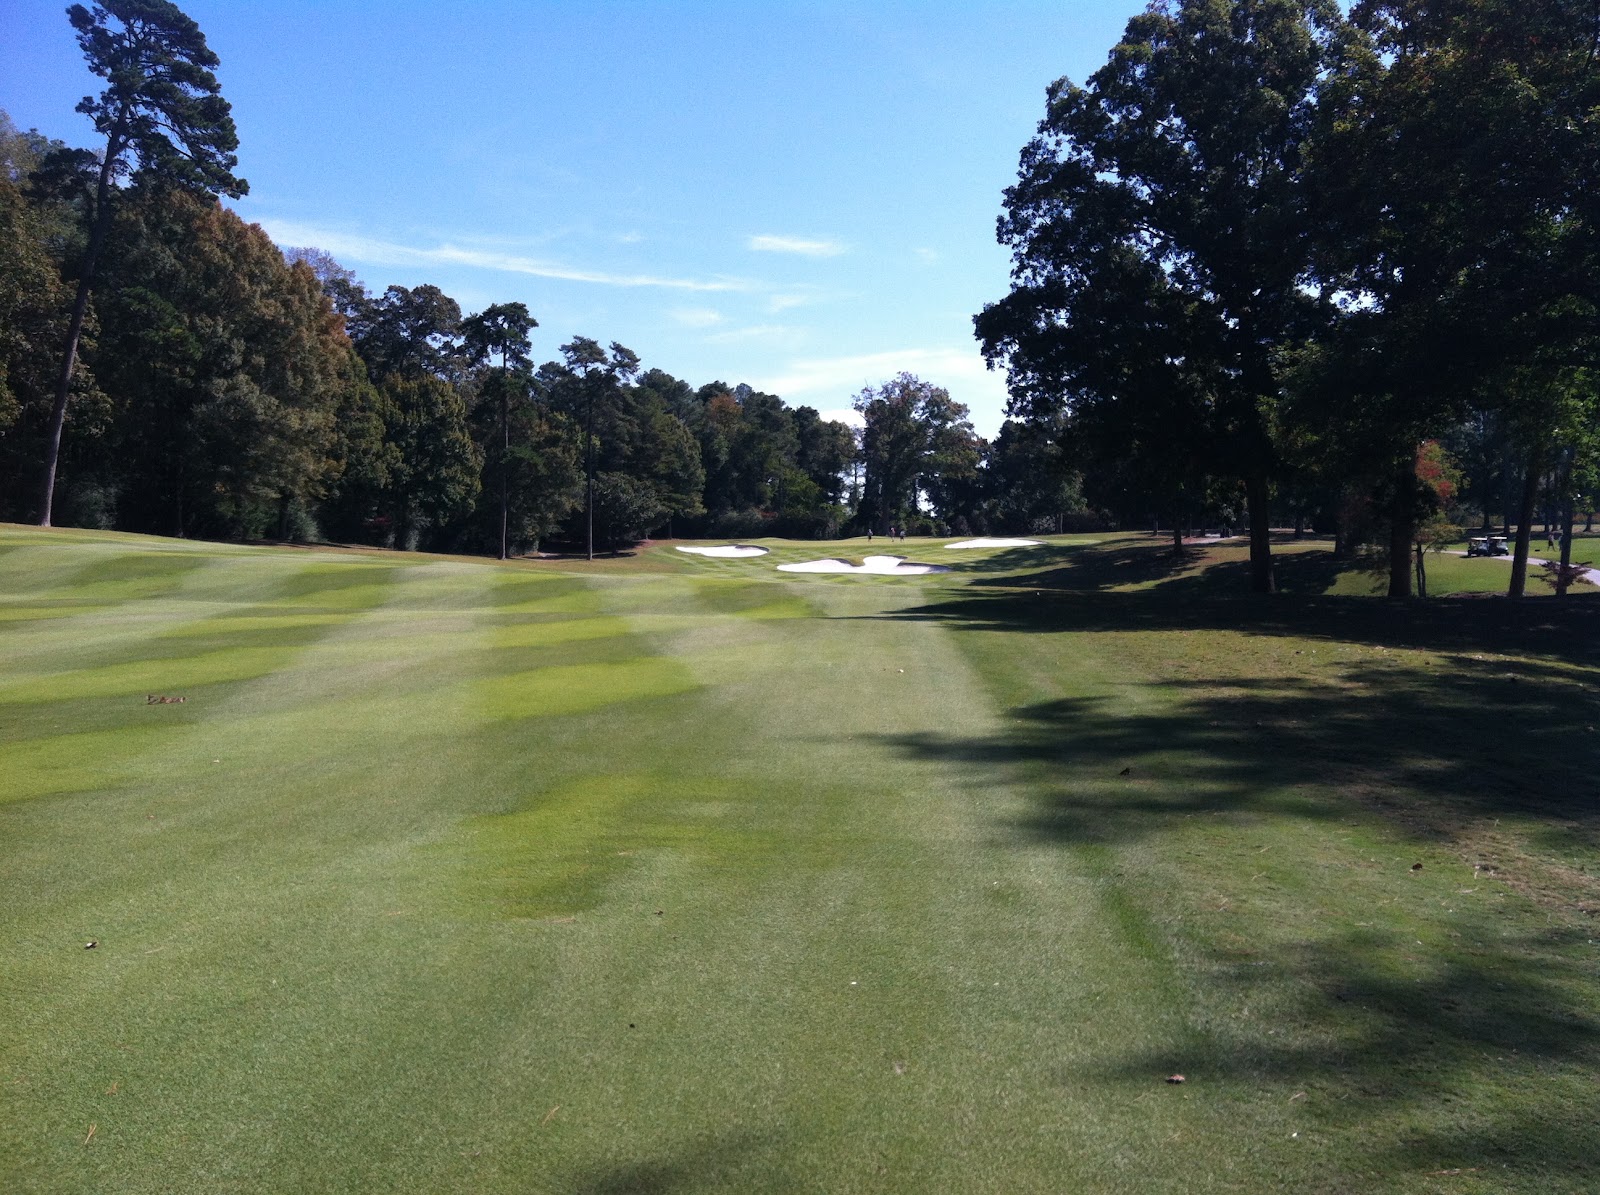
Hole #1: Par 4, 410/370 yards
The golfer is given a definite test right out of the gates, though not one that is exceptionally difficult. This hole really sets the tone for the rest of the round. As mentioned above, often times the line of play off the tee is determined by pin position. That is the case here on the first hole. As you can see in the image below, if the hole is cut on the left side of the green, as marked by the orange flag, the best position in the fairway will come from taking a line over the inside corner bunkers to the right side of the fairway. However, a pin cut on the right side of the hole is best approached from the left side of the fairway.
Oddly enough, give that there are only five fairway bunkers on the entire course, on this hole, the bunkers serve little purpose beyond visual deception today. Even from the back markers, they require a shot of only 260 yards to carry, hardly a lengthy shot for a player legitimately capable of playing a 7,414 yard golf course. But as it stands, the bunkers are there, and truthfully, they do look to be a greater distance than that off the tee, perhaps due to the fact that the trees in the background are some 340 yards away. This is an incredible opener to what will be (or at least should be) an incredible round.


From the Medal tees, the player has this view to start the round. As mentioned above, if the hole is cut left, the play off the tee is directly over the grass that separates the two bunkers. If the hole is cut right, play directly over the walk path.

From the fairway, the player now sees the large false front that will penalize any shots hit much short of the flag. The crater like bunkers will strike fear into the ones who do not find the proper side of the fairway from the tee. In this picture, the hole is cut in the center of the green, making sides less important.

This image does no justice to the contouring inside the green. This hole is cut in a bowl, with two feet of rise on either side.

Any player missing the green left will be facing a recovery shot from somewhere in this area.
Hole #2: Par 5, 584/511 yards
This hole was lengthened in recent times to give the player who is playing off the back markers the chance to play the hole as it was likely intended by Mr. Jones. From the 511 yard tees, the hole is almost certainly reachable in two shots by the best players. While it does, of course, provide a great risk-reward option at that yardage, that is likely not what Mr. Jones intended on this hole. No, from the layout of the hole it is likely that Mr. Jones intended this to be a hole that required three full shots while giving the player the option of picking either side of the split fairway to improve angle into the green.
Looking at the image below, the single black dot represents the 584 yard teeing area. From there, the pair of black dots flanking the fairway represent the 300 yard mark off the tee. From there, the green is essentially unreachable. Looking forward, to the next teeing area, you will notice a dark blue dot, then two blue dots flanking the fairway. The blue dots show the 250 yard mark from the same color teeing area. It is likely this was where Mr. Jones intended for tee shots to be played to and second shots played from; in extending the tee back, the club merely brought the intended landing area back into play.
In this case, the trees on the inside of the dogleg give the player definitive orders on how to play the hole. If the player feels he can hit a shot out over 290 yards, he can play up the right side of the fairway. However, anything shorter than 290 will likely be blocked out by the over-hanging limbs; certainly anything less than 275 will be totally blocked out. As such, the safe play is to the left-center of the fairway. This accomplishes two things: first, it opens up the best angle to the right hand fairway for a lay-up and second, gives a straight shot to the green for anyone attempting to go for the green in two. It should be noted that the right side of the fairway from the tee does provide a better angle to the narrow left-hand fairway approaching the green.
From the Medal tees, the long hitter has an extreme advantage, as seen with the purple makers. Those flanking the fairway show 300 yards off the tee, certainly within range of going for the green. The mark on the right, shows the final location for a long tee shot take up and over the large oak trees. Certainly tee shots played to there, leaving 170 yards or less to the green, were not part of Mr. Jones's original plan for the hole.


From the tee, the player can see the fairway tumbling down to the right and see the green in the distance. Hopefully the first time player has a quality caddie who can steer him down the left side of the fairway, otherwise this hole may become far more difficult than it might otherwise be.

From 200 yards out the player is faced with this view. The large right fairway allows for an easier lay-up attempt but forces the player to hit over water on his approach. The small left fairway is more difficult to hit but provides what should be an easier approach.

This is the likely approach location for those players hitting up the right fairway. The player is left to play over the water to the narrower angle of the green. This shot is no bargain.

However, approaching from the left fairway is no bargain either. This shot from just in front of the green shows the massive contouring in this green. The enormous hill can deflect balls in all directions. Indeed, the shot played from here found the water after going over the hill with fractionally too much speed and going past the pin. Par is most certainly the score to play for here; anyone trying to be overly aggressive on this hole risks paying a supreme price.
This hole gives the player a breather after what may have been a train wreck on the last hole. The entire fairway slopes down to the left, so the best play off the tee is to start one down the middle and play a fade to hold the ball in the right side of the fairway. From the right side, the player will be give an open look at the green and even allowed to play the ball in low and running if he desires. The black marks below show 300 yards from the tee. The left side of the green is guarded by a deep bunker, making approaches to a left hole location coming from the left side of the fairway less than easy. In general though, this hole does not have much going on, which gives the player a breather after two exceptional, and potentially very difficult, opening holes.


It is obvious from the tee that the fairway slopes hard to the left and the greenside bunker is also visible. It is plain to see that the right side is the preferred side.

This drive, however, did not find the right side of the fairway and the player is now facing a semi-blind shot where he is unable to see the bottom of the flagstick.

This shows the entrance to the green with the slope of the land working towards the green allowing for a running shot if desired.
Hole #4: Par 3, 166/142 yards
It is difficult to determine the overall quality of the par 3's here. The variety in yardage is there, but all the holes require aerial shots to rather large greens. The first par 3 here is the shortest. Playing over the water to a well bunkered green. While being very scenic there is little to report on this hole. Pick a yardage, play an aerial shot to the green. This set of par 3's bears a significant resemblance to what can be seen of the set at Augusta National. Bobby Jones's influence is likely the reason for that.


From the tee, the wide green is clearly visible. The green has very subtle movement and is very difficult to putt. There is also a bunker behind the green, barely visible here.
Hole #5: Par 5, 536/520 yards
The second par five of the day is one as difficult as the one before it if only due to the far less severe green. The hole is a hard, nearly ninety degree, dogleg to the right. From the tee, the player has several options. From the tee, marked with purple dot, the player can play straight from the tee to about 250 yards, perhaps a 3 wood for the best players, hugging as close to the treeline as he dares. The second play would be to play down the center of the fairway with a significant fade (or draw for left handers). 300 yards off the tee for the long players would likely end up slightly behind the dark blue dot. The third option is to play over all the trees and out to the fairway. This is no easy shot due to the height of the trees. On a straight line, 285 yards will put the player on the blue dot, 300 puts him on the pink, but any shot carrying less than 280 will likely get caught by the trees.
From the fairway, for players hitting 250-275 off the tee, not cutting the corner, a shot to the green is not likely, especially considering the hole plays uphill and the fronting bunker. From there, the player must again look at the pin position in order to play to the correct side of the fairway. Same as on #1, when the hole is cut right, the shot needs to come from the left; hole cut left, shot needs to come from the right.
On the green, there is significant movement across the huge green. Unfortunately, no pictures were taken from up close to show this. As an example, when played, the hole was cut roughly where the blue flag sits in the aerial below. That is on the top of a large and elevated shelf. This writer's 4th shot from played from the fringe near the bunker (did get up and down for par, btw). While looking at the shot, it was a very real possibility that a shot going by the hole with fractionaly too much speed could have rolled all the way off the green, and possibly 10-15 yards down the front approach. This green is solid.


From the tee, the player can see his options plainly. The straight shot down the fairway/rough line, the fade played on that same line, or the shot played over the trees. The trees are significantly taller than they appear in this picture.
This is the approach shot for the player hitting over the corner and making it about 285 yards. From here, the left side of the green is quite accessible and the right side can be accessed with a fade.

This from the 300 yard range off the tee. This opens up more of the green to players, making approaches to all hole locations easier.

Looking back down the fairway, the movement in the fairway, along with a few of the green contours can be seen.
Hole #6: Par 3, 234/194 yards
This is a hole where a solid run-up option would be an excellent addition. At 234 yards, it would be very difficult to hold a shot on the green when the greens are very firm. Add to that the difficult green contours and this hole has the potential to be extremely difficult for all but the most elite of golfers. But in general, this is a very quality hole and the internal green contours give the player a chance to work the ball around a bit once it hits the ground.


From the 194 yard tees, the hole looks much more inviting than it must from the back markers. Even still, the bunkers provide significant hazards for the player.
Hole #7: Par 4, 445/423 yards
Here we have yet another hole where the player's ability to position a tee shot can directly effect the relative ease of his second shot. From the back tees, all but the shortest of players will have to work a tee shot from left to right. From the purple spot marking the tee to the purple spot in the fairway is 275 yards, obviously the fairway runs out at this point. Certainly 275 yards is not a short distance to hit the ball, but the number of golfers really capable of playing a 7,400 yard golf course and not able to hit the ball that far are few. So the golfer must be able to work the ball off the tee unless he desires to hit a three wood off the tee.
From the purple tee marker, the blue and orange markers represent a shot hit 285 yards off the tee. Again, different hole positions require the player hit to different sides of the fairway, but on this hole, there is an additional run-up option available depending on fairway side and hole location. If the hole is located left, the preferred fairway side is right and if the hole is right, preferred fairway side is right, as it has been on several holes before. Those options are marked with the blue and orange spots to the blue and orange flags. But the front-center and center hole locations, marked with red flags, allow the player the option to roll the ball onto the green when playing from the right side of the fairway.


Hole #8: Par 4, 409/363 yards
This hole, playing from bottom to top in the image below, is the first hole of the day where the player does not need to focus greatly on positioning the tee shot. The angle to the green is not improved by a meaningful amount based on fairway positioning. The player must simply get the ball in play in the fairway in order to have a reasonable approach shot. From the black spot marking the back tee marker, the pair of golf cars in the fairway represent a shot of 285 yards off the tee. That is a substantial blow on this hole considering the uphill nature of the hole. On the approach to the green, the player will likely need to add two clubs in order to reach the green. There is nothing fancy about the hole, the player is simply asked to hit two straight shots.


Looking back down the hole, the back to front contour of the green is visible, as is the steep face of the front-left bunker.
Hole #9: Par 4, 422/382 yards
The two bunkers on the right side of the fairway protect the preferred line of approach to the green. These bunkers were added in recent years, winter 2005-2006 if the historical imagery on Google Earth is to be believed. From the back tee, marked with the purple spot in the shadows to the purple spot located directly above the bunkers, it is a 285 yard carry. The hole plays slightly uphill to there, so that would take a big hit to get past the bunkers from the back markers.
The orange spot on the left side of the fairway shows 300 yards on the most conservative line. As you can see, even to the far right hole location, the angle of no bargain; certainly the approach shot from the left side is less and less desired the farther left the hole location moves. For the first time on the day, the player is clearly directed to hit the tee shot on a single line in order to have the preferred shot into the green. The roll-up option is also available from the right side of the fairway, even if the elevation change makes it a dicey shot.


This is the only image taken from the fairway. Sadly the golf car blocks the view of the roll-up approach slope. This tee shot found the left side of the fairway and obviously had a less than ideal approach angle.
No comments:
Post a Comment